Roadmap
In this guide
- The Case for LaTeX: Why plain-text typesetting outperforms word processors for engineering coursework.
- Environment Setup: Getting started with a LaTeX distribution and configuring your editor.
- Core Foundations: Compiling a minimal document and understanding the separation of preamble and content.
- Workflow Optimization: Automating continuous compilation with
latexmkand citation management withbiblatex+ Zotero. - Project Architecture: Structuring scalable, multi-file documents with a reusable preamble.
- Templates and my
Thesis.cls. A ready-to-use template for your thesis, with a document to get you started.
To make it easy for you to set up your latex thesis so that it looks like this, supposing you have a working installation, you can download:
In case you encounter any problems, read through the rest of the article. It covers everything you’d probably need to know to fix those.
My LaTeX experience
It’s already been 2 years since I started writing my thesis. Since then, I’ve
successfully submitted and defended it and gotten my degree. I first got into
LaTeX by reading the wonderfully written and, from my point of view, immaculate
articles of Gilles Castel. I had been using vim for the better part of 5 years
back then, so his workflow did not require much tinkering on my part. It was
something I could easily replicate on my own system. The school of engineering
quickly helped me realize that, while taking notes on my computer was a piece of
cake back in those COVID days, it was not optimal for me: in class I was not
able to quickly capture sketches (without focusing too much on those and
sacrificing understanding). I turned to a more conservative solution of
handwritten notes which I could easily then integrate with my much simpler
org-mode. Still, LaTeX knowledge and experimentation is what allowed me to have
consistently high-quality reports, without ever (except for one, very particular
course) having to force myself through the tedious process of creating a presentable
office doc.
Why would I encourage you to give LaTeX a shot?
First, two easy examples for you:
- This blog post was automatically turned to this guide using my LaTeX preamble
- This sample thesis PDF was generated with less than 40 lines of LaTeX
At first, let’s try to only focus on the facts:
- Reusability: Since you’re writing in plain text you can easily share snippets across your works without having to manually adjust preferences such as fonts, colors and generic structure. I’ll build on this in the preamble section.
- Version control: You can use
gitand have it all nicely tracked. No more files namedreport.doc,report1.doc,report1.final.doc,report1.final.final.doc1 (and you can also upload them on GitHub and include them on your vanity page) - Predictability: This one is counterintuitive but LaTeX is ridiculously simple for 99% of the time (statistics source: my imagination). It is difficult to properly set up, but after that, it is deceptively easy.
- Maths and Equations (and Bibliography): If you need maths in a report, don’t even try to use Word. Just use LaTeX.
- Beauty and Consistency: I do not need to build on this, but all my reports look consistently beautiful. There is something so nice about having a signature in your work (without even trying).
Seriously, I do not see a good reason why not. But, once again, you might not be convinced. I know I would need something more tangible. I suggest that you take a look at the following image 1. These are the first pages of different projects I undertook while an undergraduate. Notice the similarities among all of those and be aware that I never worked manually on creating the table of contents (toc) nor did I mess around with the placement of the title… LaTeX handled most of this stuff for me.
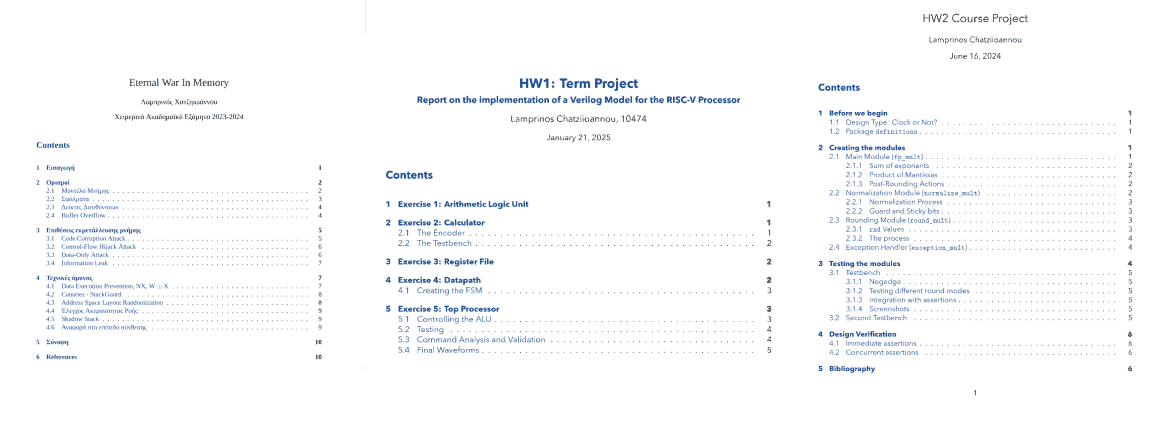
If you’re still not convinced, well, take a look at the following repos I have published on GitHub. I am not particularly proud of the work behind the scenes (I don’t even remember most of it), but you can see LaTeX work in action: the reports look consistently high-quality.
- MicroProcessors notes (useful for the exams)
- Optimization Techniques repo
- Algorithm Design and Analysis repo
Understanding LaTeX
This is not intended to be a full introduction to LaTeX. You don’t need to know anything beforehand, but you won’t become a master either. Hopefully, you’ll have enough information to let you focus on your thesis, without getting in greater depth than necessary.
An interesting bit from Wikipedia: on pronunciation
The characters ’T’, ’E’, and ’X’ in the name come from the Greek capital letters tau, epsilon, and chi, as the name of TeX derives from the Ancient Greek: τέχνη (’skill’, ’art’, ’technique’); for this reason, TeX’s creator Donald Knuth promotes its pronunciation as tɛx (tekh).
Understanding LaTeX
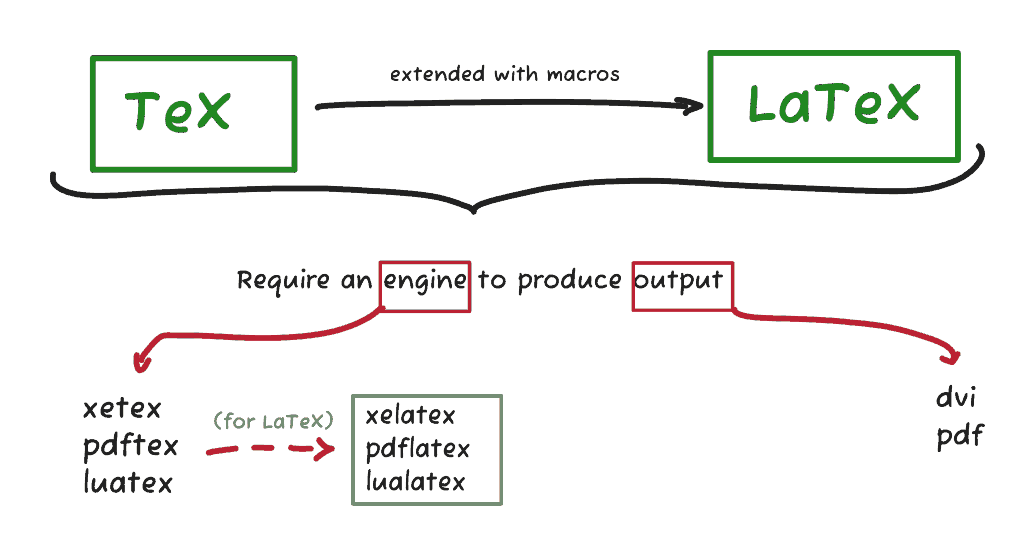
LaTeX is an extension of TeX, essentially its successor (though there are others
claiming that place as well). It is a much friendlier format to work with, since
it includes a satisfactory collection of macros and is, at the same time,
further extended by a wide range of packages, that are incompatible with plain TeX.
One creates files following these formats, but these are plain text files,
usually with the .tex extension. Much like .c or .cpp files, the author usually
wants to compile them to unlock their functionality. Compilers, in the context
of TeX are called engines, and there are multiple different of those: XeTeX,
LuaTeX and PdfTeX, to name a few. Usually these engines have their LaTeX
equivalent as well, as shown in the graph below.
Engines receive our plain-text formatted files, and produce output, usually in
the form of PDF documents. Getting this terminology right might seem tedious but
helps better understand the process later on.
Working Environment
One can work with LaTeX in many different environments. Just like most applications nowadays, there is the option of working in the cloud, a route which will almost surely lead you to Overleaf, but I prefer working locally.
To work with LaTeX locally one needs two things:
- An editor
- A TeX Distribution
The editor
I am not a zealot. I suggest you find an editor that works for you and use just
that. If you’re comfortable with vi keybindings, then nvim is a powerhouse for
LaTeX purposes, but VSCode must also be pretty good, according to some friends
of mine. Do not hassle over it, you could edit the files with Notepad and still
have no problem.
Nvim
This bit might be helpful if you use nvim:
-- Vimtex configuration, responsible for:
-- 1) Setting server name - so that inverse search works
-- 2) Setting up vimtex
--
-- Sources:
-- 1) https://jdhao.github.io/2021/02/20/inverse_search_setup_neovim_vimtex/
-- 2) https://jdhao.github.io/2019/03/26/nvim_latex_write_preview/
local function set_server_name()
    -- This only executes on windows.
        local servername = vim.v.servername
        local filename = "nvimsocket"
        local path

        path = vim.env.TEMP .. "\\" .. filename
        vim.g.vimtex_view_general_viewer = "SumatraPDF"
        vim.g.vimtex_view_general_options = "-reuse-instance -forward-search @tex @line @pdf"

        local cmd = string.format('echo %s > "%s"', servername, path)
        vim.fn.system(cmd)
end

return {
        {
                "lervag/vimtex",
                ft = "tex", -- Load only when editing .tex files
                init = function()
                        vim.g.vimtex_syntax_enabled = 0
                        vim.g.vimtex_compiler_latexmk = {
                                aux_dir = "./aux",
                                options = {
                                        "-interaction=nonstopmode",
                                        "-synctex=1",
                                },
                        }
                        vim.g.vimtex_compiler_latexmk_engines = {
                                _ = "-xelatex",
                        }
                        if vim.fn.has("win32") == 1 then
                                set_server_name()
                        else
                                vim.g.vimtex_view_method = "zathura"
                        end
                end,
        },
}
VSCode
A friend shared those
The TeX Distribution
Everything I have written about so far is platform-agnostic. It’s true for LaTeX, and LaTeX does not care about Windows, Linux or MacOS. However, when it comes to the implementation, things are slightly different.
There are different distributions for the different operating systems, and the most dominant ones are:
- TeX Live (cross-platform / Linux default)
- MacTeX (macOS bundle of TeX Live)
- MiKTeX (Windows/cross-platform)
By installing those, you effectively install multiple engines, core LaTeX files,
a package manager and some CLI tools that help you interact with the different
parts of the LaTeX ecosystem.
Though (latex) package managers are usually installed within the distribution,
on Linux it is advisable to use your (Linux) distribution’s package manager
(apt, pacman, whatever) instead of tlmgr. Mainly to ensure that everything is
automatically updated, with all components remaining compatible.2
My only tip for the Windows and MacOS users is this one: when in doubt, install more packages. If I remember correctly, both installers ask whether you want a full or a minimal installation. For beginners, the fuller installation will undoubtedly help you avoid some problems with missing packages.
Now, for Linux users, feel free to check this one out, it’s the list of texlive
packages I have currently installed.
# A gift: ;)
# pacman -Qs texlive | awk '/local/ {print $1}' | cut -d/ -f2
sudo pacman -S texlive-basic texlive-bibtexextra texlive-bin texlive-binextra texlive-fontsextra texlive-fontsrecommended texlive-latex texlive-latexextra texlive-latexrecommended texlive-pictures texlive-plaingeneric texlive-xetex
The CLI tools
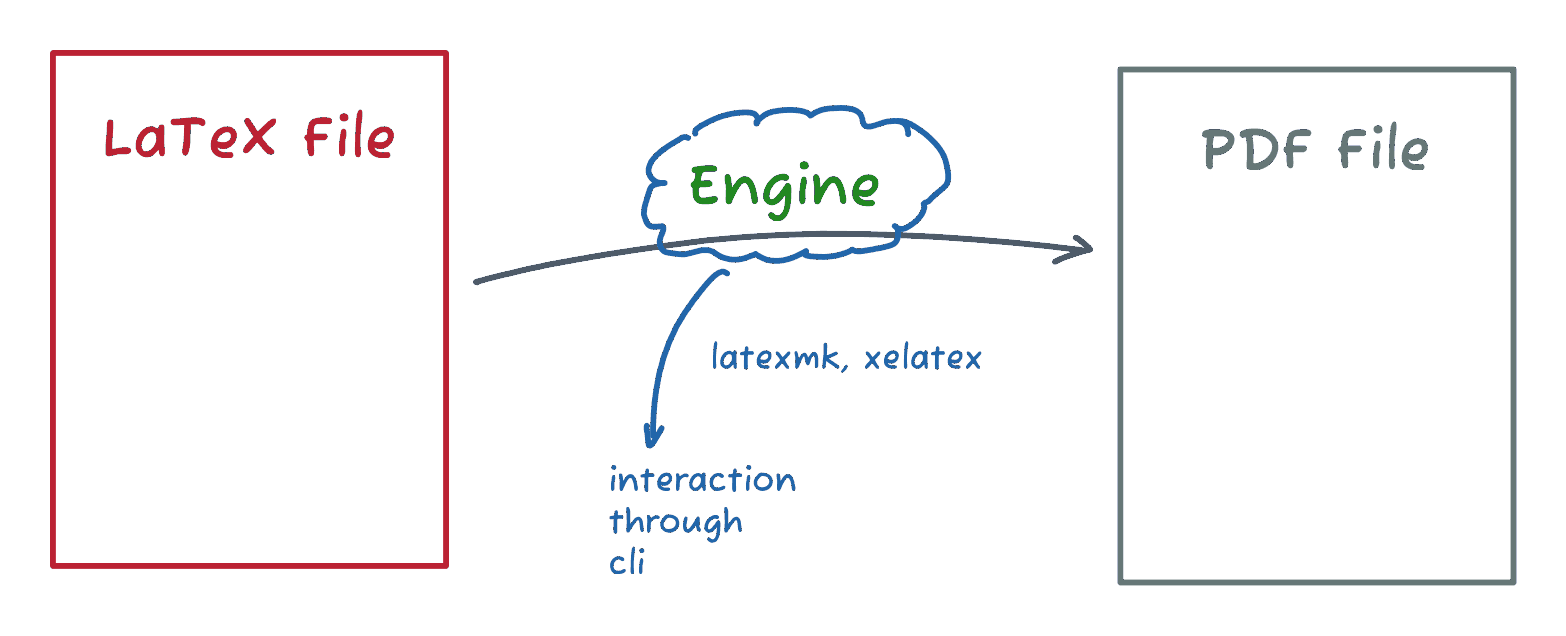
Once you have your .tex files ready, I’m sure you’ll want to have them compiled
and admire your newly created documents. To do that, though GUI solutions exist,
you might want to interact with the engine via CLI.
After spending some time researching, I settled on using xelatex and configured
my workflow around it. That’s why you’ll only see xelatex moving on3.
You can use the engine as is, but I prefer using latexmk. I like to think of it as a
naive little helper: it helps me keep my directories clean, have continuous
preview, have my bibliography without much hassle, and much more.
# Assuming that your tex file is master.tex
xelatex master.tex
latexmk -xelatex master.tex
# Using xelatex, open the preview and keep updating on changes to tex
latexmk -xelatex -pvc master.tex
# Force is usually helpful here, to ignore unimportant warnings, however make
# sure not to overdo it. I prefer working without it most of the time (since it
# might hide other problems until it's too late)
latexmk -xelatex -pvc -f master.tex
latexmk -xelatex master.tex -bibtex # if you use bibtex
latexmk -C # use this to delete files used in the compilation process
Testing your environment
If you’re following this article like a tutorial, this would be a good time to
take a step back and test your environment. Copy the following into a latex
file, read it and then use the commands found above to produce a PDF.
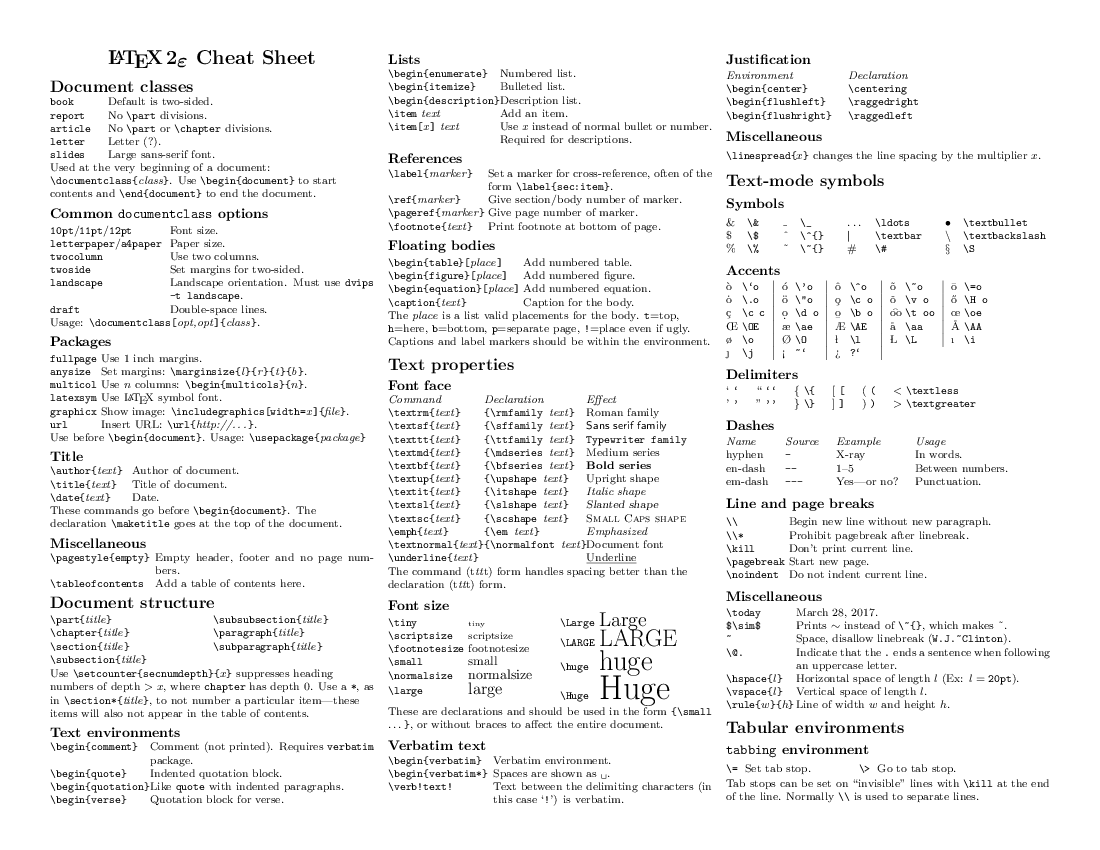
- Before getting overloaded, open this cheatsheet.
- All lines starting with
%are comments, make sure to use them wisely in your own work as well. They are not shown in the end result. - Make sure to fool around: add some lists, add bold, italics, images. Everything you’d normally do in a report. The cheatsheet I linked is more than enough.
- Try to write an equation or two!
% !TeX program = xelatex
% Try with book, report, article
% notice the differences
\documentclass[12pt]{report}

% You can play around with this one too
\date{\today}

% Add your name here
\author{Chatziiola}

\title{Hello World}

\usepackage{graphicx} % includegraphics, for images

% If you do not begin your document then nothing will be produced.
\begin{document}

\maketitle % comment this line out, see the output

% It is very easy to add sections
% \chapter{Chapter title}
% \section{This is a section}
Hello world

\begin{equation}
  E = mc^2
\end{equation}

\end{document}
Dissecting the sample document
If you take a quick look at the piece of code you’ll see that we can split it in three:
- The
documentclassline - Before the
documentenvironment - The
documentenvironment
\documentclass[12pt]{report}
The documentclass line is something you will usually ignore. Going in depth
here, would be way too time-consuming, so let’s consider it out of scope. You
only need to know that:
[these,are,optional,arguments]{not-optional}.- there are different classes such as
book, report, article - some optional arguments, such as
a4paper, 12pt4, are widely universal.
% A minimalistic preamble
\date{\today}
\author{Chatziiola}
\title{Hello World}

% you can use \usepackage{package}
\usepackage{graphicx} % allows you to use \includegraphics{} for images
That second part5 is often called the preamble. I’ve kept it simple in the
example but it does not need to be like that: my thesis preamble was more than
100 lines long. In it you:
\usepackage{package}- configure fonts, margins, colors and every other property you can think of.
It is important to note that most of these tasks can only be done in the
preamble. Try to \usepackage inside the document environment and you’ll get
compilation errors.
\begin{document}

\maketitle % comment this line out, see the output

% It is very easy to add sections
% \chapter{Chapter title}
% \section{This is a section}
Hello world

\begin{equation}
  E = mc^2
\end{equation}

\end{document}
The last part is the document itself. You can use environments and commands
(if you have properly included their packages) and practically everything you
write there will be visible to the resulting document.
Minimizing work: Your preamble
I’m sure some of you have already guessed why I broke the document down like that. The goal is the separation of structure and content. In your preamble you want to carefully define everything that should be consistent across your different projects: fonts, margins, macros, colors, packages available. That will allow you to reuse it, without needing to reinvent the wheel every time.
That’s my final tip to connect the dots. In LaTeX you can reuse
whole files by using \input{filename} and \include{filename} statements.
There is a subtle difference between the two:
\input{input_file}means that the contents ofinput_filewill be inserted as is to your existing document (behind the scenes). Thus, even ifinput_filedid not change at all, it will be fully recompiled.\include{include_file}means thatinclude_filewill be independently compiled and then inserted to the output file.
Your preamble must be inserted using \input (trust me) and for smaller projects
performance will be the same. But \include inserts the file at a new page.
A sample preamble you can use is this one:
% !TEX program = xelatex
% TODO add this to a file called preamble.tex

% Your name probably does not change across documents :P
\author{YOURNAME}

% this is a minimal configuration. feel free to expand
\usepackage{graphicx}
\usepackage{listings}
\usepackage{longtable}
\usepackage{wrapfig}
\usepackage{rotating}
\usepackage{amsmath}
\usepackage{amssymb}
\usepackage{capt-of}
\usepackage{geometry}
\geometry{
  margin=2.5cm,
  includeheadfoot
}

\usepackage{fontspec}

% Add your own fonts
% Tinos: available from google fonts
\setmainfont{Tinos}
\newfontfamily\greekfont{Tinos}

\usepackage{xcolor}
% define your own colors
\definecolor{YOURCOLOR}{RGB}{69,69,69}

\usepackage{hyperref}
\hypersetup{
  colorlinks=true,
  citecolor=YOURCOLOR,
  linkcolor=YOURCOLOR,
  filecolor=YOURCOLOR,
  urlcolor=YOURCOLOR,
}

\usepackage{fancyhdr}
\pagestyle{fancy}
\fancyhf{}
\fancyhead[L]{\textcolor{YOURCOLOR}{\rightmark}}
\fancyhead[R]{\textcolor{YOURCOLOR}{YOUR NAME}}
\fancyfoot[C]{\textcolor{YOURCOLOR}{\thepage}}

\usepackage{titlesec}
\titleformat{\section}
  {\normalfont\Large\bfseries\color{YOURCOLOR}}{\thesection}{1em}{}
\titleformat{\subsection}
  {\normalfont\large\bfseries\color{YOURCOLOR}}{\thesubsection}{1em}{}
\titleformat{\subsubsection}
  {\normalfont\normalsize\bfseries\color{YOURCOLOR}}{\thesubsubsection}{1em}{}
\titleformat{\chapter}[display]
  {\normalfont\huge\bfseries\color{YOURCOLOR}}{\chaptertitlename\ \thechapter}{2em}{\Huge}

% This is for justification purposes
\usepackage[document]{ragged2e}
\justifying
\sloppy
\setlength{\parindent}{2em}
\setlength{\RaggedRightParindent}{\parindent}
Αν γράφετε σε ελληνικά, δώστε ιδιαίτερη προσοχή στις γραμμές του fontspec. Δεν
χρειάζεται να μπλέξετε με περίεργα packages, ούτε να χρησιμοποιείτε εντολές για
αλλαγή γλώσσας. Χρειάζεται απλά (όταν έχετε xelatex) να χρησιμοποιείτε
γραμματοσειρά που να υποστηρίζει τα ελληνικά.
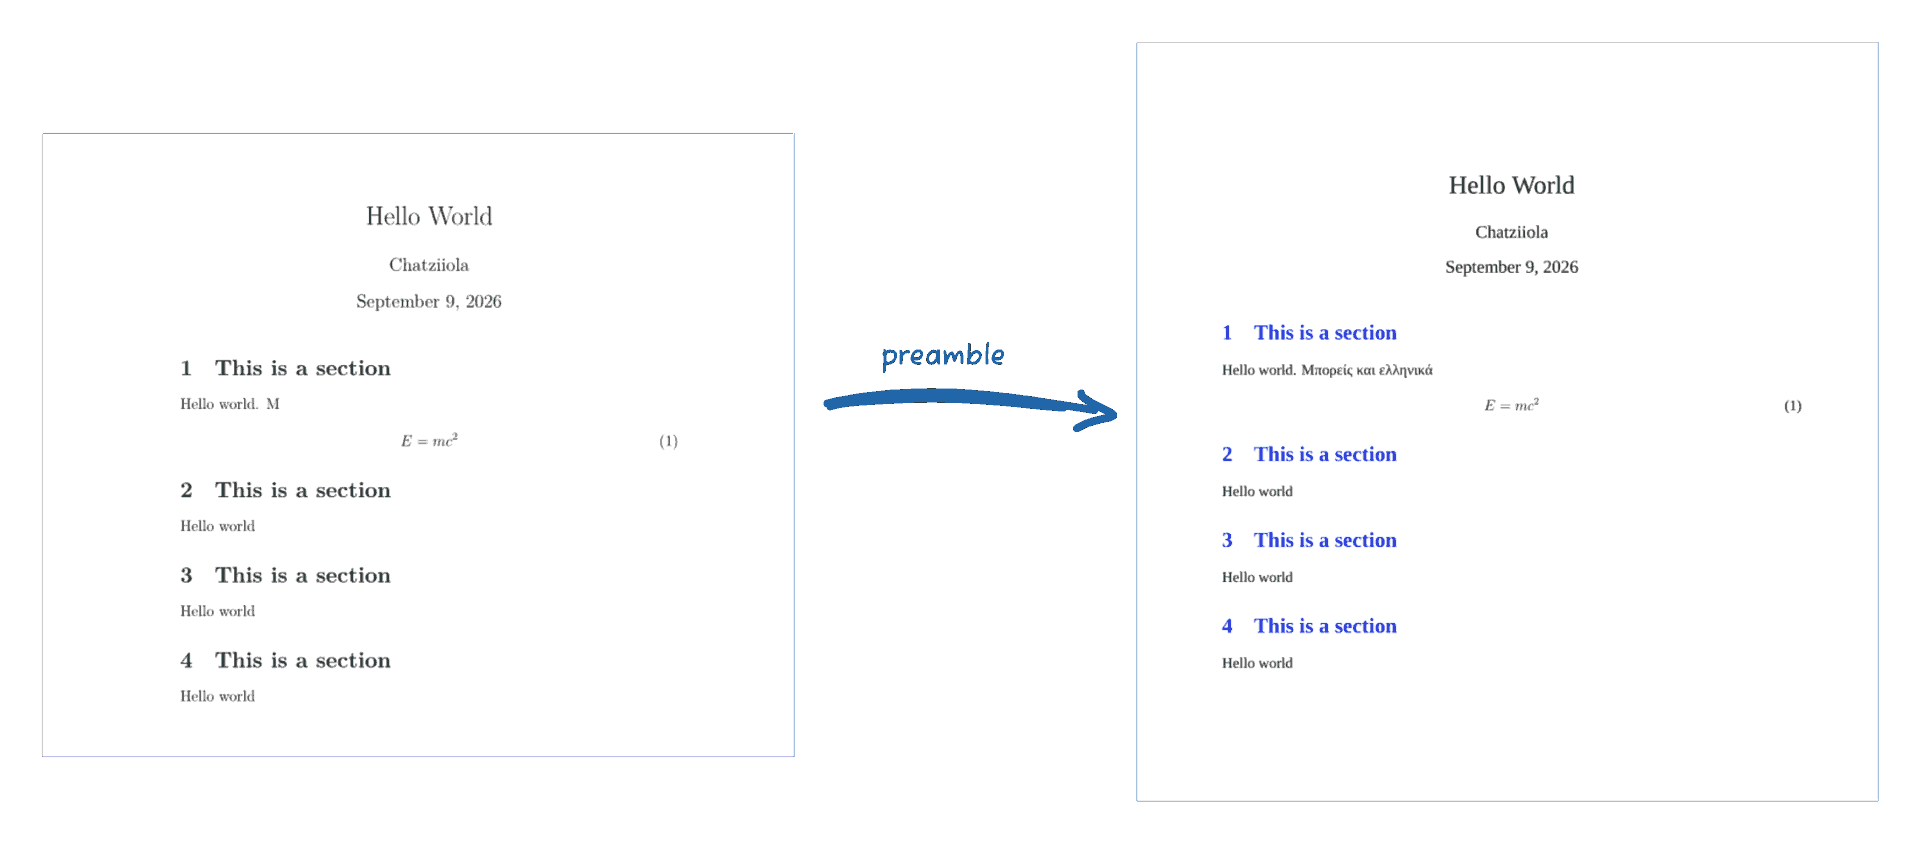
Having a preamble, your documents can start looking more like:
% !TeX program = xelatex
\documentclass[12pt]{article}

% Configuration is hidden in here
\input{preamble.tex}
\title{YOUR TITLE}

\begin{document}
% Your content
\end{document}
Bibliography
For some reason I get a feeling of satisfaction when reading papers and being
able to see the sources, or coming across blogs like gwern.net that document
their inspiration. When I took up latex I saw that I could do that very easily.
All I had to use was a package like biblatex (please do not go for bibtex,
you’ll regret it down the line), have a .bib file and have my references…
It can be that simple, but not if you decide to manually write your entries.
This bib entry does not have many fields nor is it particularly complex. Most of
the entries I used on my thesis have 2 or 3 times the size. I did not add them
manually. I used Zotero, per this guide. In essence, you install Zotero locally,
then the browser plugin, and whenever you find a good article or book, you use
your plugin to create an entry on your Zotero library. Then inside Zotero you
can export your selected library to biblatex (and keep it updated!), thus
automating the creation of your .bib file.
If you follow this workflow, then you do not need to change anything6, other than
\usepackage[...]{biblatex}to actually usebiblatex.\addbibresource{your-bib-file.bib}, to select your bibliography file.- use
\citeto make your citations - use
\printbibliographyto have a beautiful bibliography (with backlinks) automatically created for you
Take a look at this snippet (it will not compile as is):
% ...

% use this in the preamble
\usepackage[backend=biber, style=numeric, sorting=ynt]{biblatex}
\addbibresource{your-bib-file.bib}

%...

% main document
\begin{document}

blah blah blah\cite[p.4]{LamprinosChatziioannou2022}. Yes I truly said that.

\printbibliography[heading=bibintoc]

\end{document}
Going forward
At this point you should get the picture. Your directories should look like that:
preamble.tex % Common across projects, no need to copy
thesis-or-big-project/
├── master.tex
├── thesis.bib
├── figures/
└── chapters/
    ├── 01_introduction.tex
    └── 02_methodology.tex
small-project/
├── report.tex
├── figures/
└── references.bib
Some generic tips:
- Your
\includedfiles do not need to have apreamblenor adocumentenvironment. You can write in those as if you’re already in your document. - Tables are tricky to get right, I settled for the
xltabularpackage, with slight modifications usingbooktabs, array, rotating, threeparttablex, and commands like\newcolumntype{Z}{>{\raggedright\arraybackslash}X}. - Creating graphs with pure LaTeX isn’t practical. While you might get
something out of that, I prefer creating the graphs with
python,matlabor anything else. LaTeX is my last resort for that. - You can use
labelandcref(from thecleverefpackage) to make references to figures and sections in your documents easily If you want justified text, make sure to use the
ragged2epackage. I used it like this:\usepackage[document]{ragged2e} \justifying \sloppy \setlength{\parindent}{2em} \setlength{\RaggedRightParindent}{\parindent}- You can download
.clsfiles and then replace your\documentclasswith the “new” class. You’ll probably find yourself doing that for big projects, such as your thesis. You can download fonts locally and configure
fontspecto load the fonts from files and not to rely on your system’s fonts (that is particularly useful if you’re using a niche font and you want to collaborate with others). Also, check out latex-fonts.% Example of local fonts \setmainfont{AvenirNext}[ Extension = .otf, Path = ./fonts/AvenirNext/, UprightFont = *-Regular, BoldFont = *-Bold, ItalicFont = *-It ]- Use
gitvigorously - it’s better to have the option of looking back. If you want to use multiple images,
graphicx, subcaptionare all you need:\begin{document} \listoffigures \vfill \begin{figure}[ht] \centering \begin{subfigure}[b]{0.4\textwidth} \centering \framebox[3cm]{\strut Subfigure 1} \caption{First subfigure} \end{subfigure} \hfill \begin{subfigure}[b]{0.4\textwidth} \centering \framebox[3cm]{\strut Subfigure 2} \caption{Second subfigure} \end{subfigure} \caption{Main figure container} \end{figure} \end{document}- If you use multiple languages, such as Greek,
xelatexis the way to go. Look at this. You only need to use a font that supports the necessary characters. - If you ever want to use
glossaries,
On templates
- IEEE Template Selector: Gives you the ability to download LaTeX templates.
- Feel free to modify the preamble, while also using the sample master.tex
- I have created this gist, which I encourage you to copy and use. If you
download it and have the necessary fonts available then the following
master.texis a good place to start.
% !TeX program = xelatex
\documentclass{Thesis}

% Details
\date{\today}
\title{Test}
\titlegreek{Τεστάκι}
\authors{Lamprinos Chatziioannou}
\university{\texorpdfstring{\href{https://www.auth.gr} {Aristotle University of Thessaloniki}} {University name}}
\department{\texorpdfstring{\href{http://www.ece.auth.gr/el/} {School of Electrical and Computer Engineering}} {Department or School Name}}
\faculty{\texorpdfstring{\href{https://www.auth.gr/en/faculty/eng-en/} {Faculty of Engineering}} {Faculty Name}}
\degree{Integrated Master in Electrical and Computer Engineering}
\supervisor{\texorpdfstring{Supervising Professor's name} {Supervising Professor's name}}
\universitylogo{figures/logo-auth.png} % find yours
\universitygreek{\texorpdfstring{\href{https://www.auth.gr}{Αριστοτέλειο Πανεπιστήμιο Θεσσαλονίκης}}{Αριστοτέλειο Πανεπιστήμιο Θεσσαλονίκης}}
\facultygreek{\texorpdfstring{\href{https://www.auth.gr/en/faculty/eng-en/}{Πολυτεχνική Σχολή}}{Πολυτεχνική Σχολή}}
\departmentgreek{\texorpdfstring{\href{http://www.ece.auth.gr/el/}{Τμήμα Ηλεκτρολόγων Μηχανικών και Μηχανικών Υπολογιστών}}{Τμήμα Ηλεκτρολόγων Μηχανικών και Μηχανικών Υπολογιστών}}
\authorsgreek{Λαμπρινός Χατζηιωάννου}

\begin{document}
    \maketitle

    \begin{abstract}{Abstract}
    Hey hey my my
    \end{abstract}

    \begin{abstractgreek}{Περίληψη}
        Ελληνικό
    \end{abstractgreek}

    \dedicatory{Για το φώς στα σκοτάδια}
    \tableofcontents
    \chapter{First chapter}
    This is a test
    \chapter{Αρχίζει καλά}
    Λαμπρινός Χατζηιωάννου

\end{document}
Footnotes:
Unless you … https://xkcd.com/1597/
Distro repositories usually lag CTAN by 1-2 years. Due to that, vanilla Tex Live installations might be useful under certain circumstances.
I would argue that 99% of this article is applicable to all engines, but
xelatex was chosen to make my life writing documents with both English and Greek
as easy as possible.
Font size in general
It can be integrated within a class, but having it standalone offers greater flexibility.
You might need to install biber separately with your package manager.